After finishing my big 20cm*20cm softbox speed grid I had some leftovers from the black corrugated plastic sheeting (that the material that used my to do the grid itself-if you know how it is really called please tell me!),I decided to go on and build a small speed grid of the hot shoe flash that I use (Canon 580EXII 550EX and 430EX).This project is a very easy one and will expand your flash ability and creativity.
So lets start this fun project with our “shopping list”:
What we need:

- 1 black maple sheet-I use it also for some products shots.
- 1black corrugated plastic sheet,or left overs from the 20cm*20cm softbox speed grid project.
- good contact glue
- some rubber bands
- a pair of scissors
- a marker
- An utility knife
- big&strong ruler
1.Measuring and cutting the maple sheet for your speed grid:
- Measure your flash size height and width – with the Canon 550EX who is the “biggest” flash that I have it is – 4.5cm height,8cm width.
- Mark those sizes on the maple sheet and leave 2.5cm margin on one side of the paper,those margins will help you close the speed grid together.
- If you are building it for your Canon speedlite 550EX You should cut a 27.5cm by 10 cm piece.
- You should mark and cut it like this(make your width adjustments if you are going to build it for other type of hot shoe flash):
- Make some soft and not deep cuts on the lines (4.5cm,10cm,4.5cm and 10cm) with your utility knife-this will help you to bend nicely the mapel sheet.

2.Now lets cut some stiripes of the corrugated plastic sheet.You should cut it 8 cm wide and about 1cm-2cm long.You should have about 20 of those stripes in order to pile them 4.5cmcm hieght.
[ad#post-728]
3.Glue them together.As I did in the previous project I advise you to glue groups of 4-6 stripes together and them glue the groups together.You should have a 4.5cm height of stripes like in the following picture:

4.Put generous amount of the glue both on the grid panel and the mapel paper.Let it dry of some minutes before attaching it together.

5.Attach them together.Use the rubberbands to let it stick together.If you followed the instructions you should have something like that:

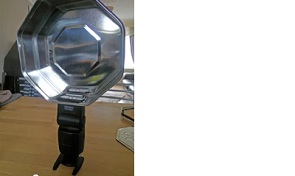
6.Now you have you own hot shoe flash speed gird.All it takes is about 20minutes and a couple of bucks for materials!
Here is the first pictures from the speed grid:


Share your tips and your DIY speed grid photos with us!Please Comment!

I use the same type of grid made out of chloroplast but make the top and bottom parts of the grid longer, like a “flap”, so that they can be used to go over the flash head. Then I put some duct tape on the sides to block the light from escaping. More duct tape is added to the inside to get rid of the inside sticky part of the first wrap of duct tape. I use a hair band to go over those “flaps” and this secures the grid to the flash head.
Hi Rick,
I gues the DIY Flash grid of straws or anything similar is one of the first DIY project we strobists try.
Very usefull however!
`-)
TNX