As I might mention some posts before , my first try at more “normal” lighting diffusers, was some years back when a friend of mine (Chen, thank you!) got me a Photek Brolly from B&H, those where times where shipping wasn’t so easy to Israel and not so many alternatives for Continue Reading
DIY projects
Learn how to build easy DIY project we use on this site to amazingly improve your photography skills!
Two Cool Diy SoftBox Videos Plus Images
Hi you all, on of my favorites and most viewed post on this site, is probably one of my first post about diy softbox , I must say that since then there are some handy and really affordable softbox solutions for smal flashes, if you want to go for the best pruductsa, Continue Reading
DIY Universal Softbox Small Flash Mounting Adapter
Some time ago (it sounds like a kids story), there were no Wescot folding softboxes and no Ebay or chinice like products for even more tight budgets, so all you can get was or Bowens mount softboxes or what we called universal mount softbox. The only thing was, that even Continue Reading
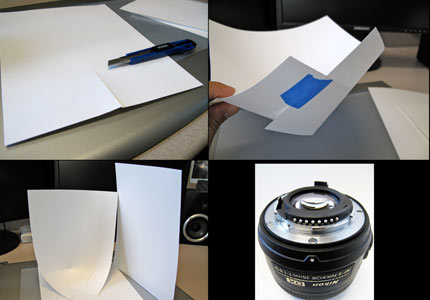
DIY Macro Diffuser – Cheaper Than Anything!!!
Hi, I read a post at dpreview written this guy Mark Watson, he has a very good super macro gallery on flickr – link, so he’ve been asked to share the way he got the right lighting for those macro images, so he did, and that’s ridiculously easy, handy and cheap! Continue Reading
Cinemagraph by Jamie Beck- A new amazing technique!
I can’t tell or explain this for myself, so first of all I’ll want you to take a look at those first couple of images (right reserved to Jamie from this blog):
Light Painting
Hey Just wanted to share with you guys another Flickr gallery. This technique is generally based on really long exposure time (mainly using bulb mode for over 30secs exposure) and some colorful light objects like flash lights with color gels, small sparkerls or any other light source that you might Continue Reading
DIY 9.5ft Boom
When you are out on location shoot and need to out a high light above your model, you’ll nned to use a boom. If you do it in your studio, there is a boom that connects to a studio tripod and you can place your flash there. When you’re out Continue Reading
Easy carton DIY ringflash
A RingFlash is a very cool flash tool.Many of the current “young”/”cool” look images are done using this gadget. When You try to go the DIY way, there are many ways to improvise the ringflash.In many of those DIY RingFlash you’ll have do manage a hole into a metal salad Continue Reading
The easiest product photography setup ever
One of the most popular question on the web, when starting to learn photography is how do improve your product photography. Somehow you don’t have to own an online ebay shop in order to be interested in product photography.It simply a common task to do when you start to explore Continue Reading
DIY grid for small flashes with diy grid materials
As I mentioned a couple of posts before, one of the most common ways to build a DIY grid for small flashes is to use the “glue it straws” way. “The glue it straws” way was cover in this post DIY grid , basically you cut some straws into small Continue Reading
DIY grid material on Ebay!!!
Hey! After doing a couple of DIY grid projects in here, its time to show something very nice I found on Ebay a couple of weeks ago, after searching for some gel filters I accidentally visited a store called “The strobist corner”. Well he sells some gel filters and very Continue Reading
DIY Canon 550EX flash grid
A grid is the light modifier that you’ll use when you want to focus or narrow your flash beam of light, and let it be concentrated in one strong beam.There is a way to narrow and control the flash light beam by using the manual zoom angle control (this option Continue Reading
DIY flash gel filter holder-Quick and easy
You probably heard about the free gel filters packages that sometimes in the past where send to everyone that requested them.Well I believe that the filter manufacture companies went bankrupt as the word spread around the photography community.Now there are some sets that are sold on eBay Adorama ans such Continue Reading
DIY Small softbox from Shoe box
Well we had a sale in the Adidas outlet store near the place that I leave in.As a very enthusiastic jogger (yes my passion is divided into two : photography and running).With very good proces before the Israely holidays I couldn’t resist it and bought two running shoes…You couldn’t imagine Continue Reading