Hey this time I bring you a very simple product photography setup,using just one flash (canon 550EX).
We will learn during this tutorial :
- How to simply setup this product photography setup.
- Setting up the only light you need for those professional shots.
- Setting up the camera parameters aperture,shutter speed and iso and the flash power .
- Using some card boards as reflectors,for more pro look photos.
So lets start going!
First of all how we did this extremely simple setup?
1.I have at home some old chair that I use as a table for the small products shoots.You can use any thing you see with the same dimensions – a strong carton box,table,chair or anything.As the board for the products I used a metallic billboard that I no longer use.The advantage of the metallic is obvious,It gives the photos some reflection and rough look. I used here a perspex board , about 40cm*40cm that I have.It will help speard the light from the flash unit in a more equal way .I put the on two boxes that I found in a drawer so there will be some margin between the product and the perspex board.
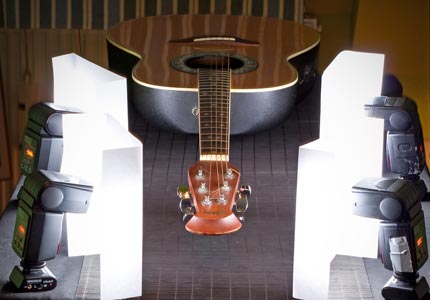
2.As you can see,I used only one flash here and I mounted it on a flash stand just behind the setup and above the perspex board.
You can see the simple product photography setup here (sorry for the picture bad quality,it was a rip from my first video tutorial for youtube.com):

3.Setting up the camera was an easy thing,I generally start with
- iso400 (when I shoot indoor)
- shutter speed of /160sec (killing ambient light)
- aperture f/6.3 (for good depth of field)
- Flash 1/16 max power
- Camera on tripod and remote control trigger (no camera shakes as using Canon 100mm Macro)
The first two shots where taken with those settings no reflectors used:


As you can see the results are quit sharp and well exposed.No photoshop used here.But we want to give the shots some more light especially at the bottom.
4.For the extra light we used a hand held white reflector (I mainly use a cheap white foam board,as you can see in other tutorials I did here) .The results are better,the bottom side of the cucumber is brighter and you can so more details on the remote trigger as well:


Thats all for this time.If you wonder , the cucumbers are home made cucumbers that I grow in my backyard GREAT!!!
Please share your thoughts and examples here.

One thought on “One light simple product photography setup”