Hi, recently a friend of mine, who has a beehive (Yep she and her family makes honey for years) , asked me to shot some images of the products they are going to put on sale during the upcoming holiday here in Israel .As I was sure we are going Continue Reading
Stills Photography
Using gels for product photography- part I
Hey, I saw a great tutorial in Stefan’s site (you can get the link in my favorites).He have been shooting products (hand made great looking funny dolls ).Stefan uses a professional studio and pro flashes for his work and you can see the diargrams of some of his studio sessions Continue Reading
Amazing product photography 1$ technique!-Part II
Great product photographs in no time and priceless look,this is what you are going to learn in this tutorial! If you are not familiar with part I of this tutorial take a look in this link amazing product photography where you’ll get an idea about how I did that setup Continue Reading
Amazing product photography 1$ technique!-Part I
Amazing product photography 1$ technique! If you want to know how to do this easy 1$ (if you have the off camera flashes) dig in there are some examples and outcomes that you wouldn’t imagine how easy it is to do it!!! For the bset use of this tutorial you Continue Reading
One light simple product photography setup
Hey this time I bring you a very simple product photography setup,using just one flash (canon 550EX). We will learn during this tutorial : How to simply setup this product photography setup. Setting up the only light you need for those professional shots. Setting up the camera parameters aperture,shutter speed Continue Reading
Products Photography-Using Gels For Special Effects
Many times I’m asked how those kind of pictures are taken.I must say that at the beginning I thought that it was a much more complicated process.Actually that when I show this picture to my wife she didn’t believed me that it is mine until I show her the KONICA Continue Reading
One light basic product photography setup
Here is another basic product photography with one flash light shooting through the DIY SoftBox we made earlier. This time we are shooting a bottle of Drabuie (whom would have been already empty unless I planed to shoot it…) on a black background. The ingredients: 1 bottle of Drambuie Black Continue Reading
Poor’s men product photography setup
The stuff you need for this setup: Two bed or reading lights(bulb should be the same type for the sake of right WB) White perspex board (I used here a 40*40 piece) Another white panel to use as a reflector (you can use a foam board). Here are two suggested Continue Reading
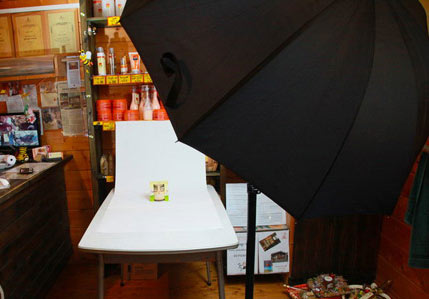
Simple studio product photography setup
Easy to do small DIY product photography setup with home made lighting stuff. Simple studio product photography setup that will get this: You probably heard the words: “one pictures worth thausends words”…Yep today you must have good pictures of your products in order that the potential web costumer wil shop Continue Reading